
Loaded Taco Dip
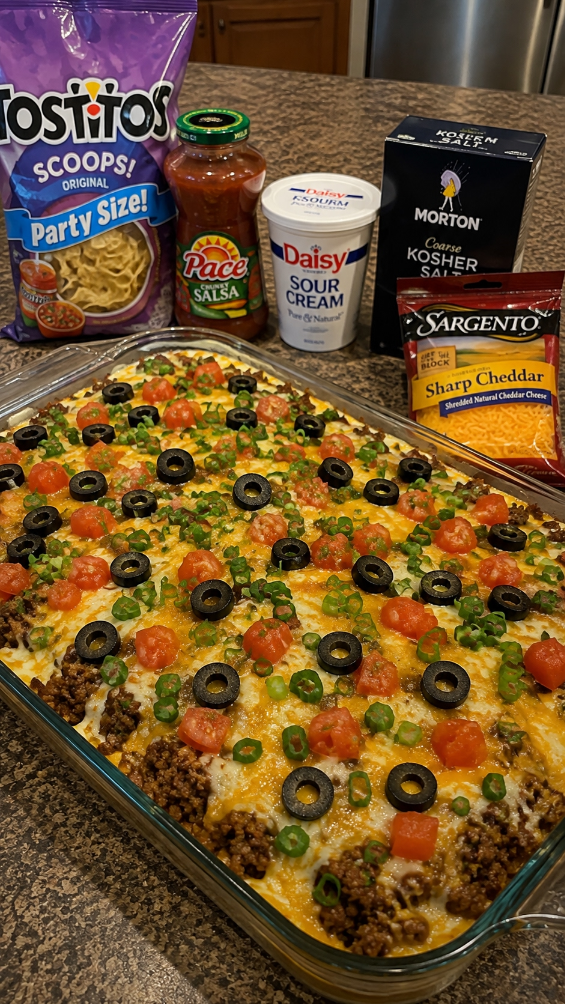
I’ll never forget the first time I brought a loaded taco dip to a potluck. I was nervous—honestly, I thought it might be too simple, too casual for the occasion. But the moment I set it down on the table, something magical happened. People crowded around it, scooping it up with tortilla chips like they hadn’t eaten in days. My friend Sarah came back for thirds and asked me for the recipe before dessert was even served. That’s when I realized this wasn’t just another appetizer. It was a conversation starter, a comfort food, a reason for people to gather.
A loaded taco dip is exactly what it sounds like: layers of creamy, savory, and spicy goodness that tastes like all your favorite taco fillings, but in dippable form. It’s got that perfect combination of cool sour cream and cream cheese base, warm seasoned ground beef, melted cheese on top, and all those fresh, crunchy toppings that make every bite interesting. I’ve made this recipe dozens of times now—for game days, family dinners, unexpected guests, and quiet Friday nights when I just want something satisfying without a lot of fuss.
What I love most is how forgiving this recipe is. You don’t need fancy ingredients or special skills. You probably have most of what you need in your kitchen right now. And here’s the thing: it’s impossible to mess up. Even if your layers aren’t perfectly neat or you add a little extra of something, it’s still going to taste delicious. Whether you’re feeding a crowd or making it for yourself and a few friends, this loaded taco dip works every single time. Follow me on DianaCookingE on Pinterest for more easy appetizers and party recipes.
Why You’ll Love This Recipe
First, there’s the texture contrast. You’ve got the cool, creamy base, the warm, seasoned meat, the melted cheese, and then those crispy, fresh toppings on top. Every single bite feels different, and that’s what keeps people coming back for more.
Second, it’s genuinely easy to make. Most of the work happens in one skillet, and then you’re just layering things in a baking dish. No complicated techniques, no stress. I can have this ready to go in about 20 minutes, start to finish.
Third—and I can’t stress this enough—it’s customizable. Want it spicier? Add jalapeños or hot salsa. Prefer it milder? Use mild seasoning and skip the hot sauce. Have leftover bacon? Throw it on. This recipe is a blank canvas, and you’re the artist.
And finally, it feeds a crowd without breaking the bank. The ingredients are affordable, and you can stretch it further by serving it with more chips or alongside other appetizers. It’s the kind of dish that makes you look like you’ve put in way more effort than you actually have.
Ingredients for Loaded Taco Dip
- 1 pound ground beef
- 1 packet (1.25 ounces) taco seasoning
- 8 ounces cream cheese, softened
- ½ cup sour cream
- ½ cup salsa (mild or medium)
- 1½ cups shredded cheddar cheese, divided
- ½ cup shredded mozzarella cheese
- 1 can (15 ounces) black beans, drained and rinsed
- 1 cup corn (fresh, frozen, or canned)
- ¼ cup diced red onion
- ¼ cup fresh cilantro, chopped (optional but recommended)
- 2 green onions, sliced
- 1 jalapeño, diced (optional)
- Tortilla chips for serving
Diana’s Tip: Don’t skip softening the cream cheese. It makes layering so much easier. I usually leave mine on the counter for 15 minutes while I cook the beef.
Optional Add-Ins and Variations
The beauty of this dip is that you can customize it however you want. Here are some of my favorite additions:
- Protein swaps: Use ground turkey for a leaner option, or skip the meat entirely for a vegetarian version.
- Extra vegetables: Diced bell peppers, tomatoes, or zucchini add freshness and nutrition.
- Heat level: Add diced jalapeños, a splash of hot sauce, or cayenne pepper if you like it spicy.
- Toppings: Crispy bacon, sliced olives, avocado, or pico de gallo all work beautifully.
- Cheese changes: Try pepper jack for a kick, or use all cheddar if that’s what you have.
Step-by-Step Method
Step 1: Cook the ground beef
Heat a large skillet over medium-high heat. Add the ground beef and cook, breaking it up as it browns, for about 5 to 7 minutes. You want it fully cooked with no pink remaining. Drain any excess fat if needed—I usually leave a little in there for flavor, but that’s personal preference.
Diana’s Tip: Don’t skip draining the fat. Too much oil makes the dip greasy, and nobody wants that.
Step 2: Season the beef
Add the taco seasoning packet and about ¼ cup water to the cooked beef. Stir well and let it simmer for 2 to 3 minutes until the sauce thickens slightly and coats the meat. The smell at this point is incredible—warm spices, savory beef, the whole kitchen smells like tacos.
Step 3: Prepare the base layer
In a small bowl, mix together the softened cream cheese, sour cream, and salsa until smooth and well combined. This is your creamy foundation, and it should be spreadable but not too thin.
What I Messed Up At First: I used cold cream cheese once, and it was lumpy and difficult to spread. The dip still tasted good, but it didn’t look as nice. Soft cream cheese is key.
Step 4: Layer it up
Spread the cream cheese mixture evenly into a 9-by-13-inch baking dish or a large oven-safe skillet. Next, spread the seasoned ground beef over the cream cheese layer. Then scatter the black beans and corn over the beef. Finally, top with the cheddar and mozzarella cheese.
Diana’s Tip: If you’re making this ahead, you can stop here, cover it with plastic wrap, and refrigerate it until you’re ready to bake.
Step 5: Bake
Preheat your oven to 350°F and bake the dip for 15 to 20 minutes, until the cheese is melted and bubbly around the edges. You’ll know it’s ready when you can see the cheese starting to brown slightly and the whole thing smells warm and inviting.
Step 6: Add fresh toppings
Remove the dip from the oven and immediately top it with the sliced green onions, diced red onion, cilantro, and jalapeños if you’re using them. The heat from the dip will slightly soften these fresh toppings while keeping them fresh and crunchy.
Step 7: Serve
Set the dip on a trivet or hot pad (it’ll be very hot), surround it with tortilla chips, and watch it disappear. Seriously, this stuff goes fast.
Common Mistakes to Avoid
Using cold cream cheese: This creates lumps and makes layering frustrating. Let it soften on the counter first.
Not draining the ground beef: Too much grease makes the dip oily and less appetizing. Drain it well.
Overcooking the dip: You only need it hot and bubbly. Overbaking can dry it out or cause the cheese to separate.
Forgetting the fresh toppings: These are what make the dip special. They add brightness and texture that the warm layers alone can’t provide.
Making it too far ahead: While you can assemble it earlier, I don’t recommend baking it more than a few hours in advance. It’s best served warm and fresh from the oven.
My Tested Substitutions
I’ve played around with this recipe more times than I can count, and here’s what actually works:
Cream cheese alternative: If you don’t have cream cheese, you can use a mix of sour cream and mayo (about ¼ cup each mixed with the sour cream), but the texture won’t be quite as rich.
Salsa swap: Use pico de gallo, homemade salsa, or even ranch dip if that’s what you have. Each one changes the flavor slightly, and they’re all good.
Cheese options: Any melting cheese works here. I’ve used Monterey Jack, pepper jack, or even a Mexican blend. Avoid crumbly cheeses like feta or goat cheese.
Bean alternative: Don’t like black beans? Use pinto beans, kidney beans, or refried beans. Or skip them entirely if beans aren’t your thing.
Meat-free version: Make it vegetarian by omitting the beef and adding an extra ½ cup of corn and some diced bell peppers. It’s still delicious and filling.
How to Customize
Here’s the thing about this recipe: it’s meant to be personalized. Think about what you and your guests actually enjoy eating. If someone’s vegetarian, make a version without meat. If your family loves spice, load up the jalapeños and hot sauce. If you’re serving people who prefer mild flavors, stick with mild salsa and skip the heat.
I once made this dip with crispy bacon crumbled on top because I had some leftover from breakfast. My husband asked me to make it that way every time. Another time, I added diced avocado right before serving, and it was phenomenal. These little tweaks make the recipe feel like yours, not just something you copied from the internet.
[INTERNAL LINK: Easy appetizers for entertaining]
Serving Ideas
Obviously, tortilla chips are the classic pairing, but there are other options too. I’ve served this with pita chips, toasted baguette slices, and even bell pepper strips for a lighter option. You could also serve it alongside other appetizers like guacamole, salsa, or queso for a full spread.
At parties, I like to put the dip in a smaller baking dish or slow cooker to keep it warm throughout the event. You can also divide it into two smaller dishes so people can grab from different spots without crowding around one bowl.
For casual family meals, I’ve served this alongside rice and beans for a complete dinner. It’s not traditional, but it works.
Meal Prep and Storage
Make-ahead: Assemble the dip completely (before baking) up to 24 hours ahead. Cover it tightly with plastic wrap or foil and refrigerate. When you’re ready, just pop it in the oven for 20 to 25 minutes (it might need a few extra minutes since it’s cold).
Leftovers: Store any uneaten dip in an airtight container in the refrigerator for up to 3 days. Reheat it gently in a 325°F oven for about 10 minutes, or microwave it in a bowl for 1 to 2 minutes, stirring halfway through.
Freezing: You can freeze the assembled (unbaked) dip for up to 2 months. Thaw it in the refrigerator overnight before baking.
Diana’s Tip: I don’t recommend freezing after baking because the texture of the cream cheese layer can get a bit grainy when thawed.
Nutritional Breakdown
This dip is definitely indulgent, and I’m not going to pretend otherwise. It’s meant to be a treat, an appetizer, something you enjoy in moderation. That said, it does have protein from the beef and beans, and vegetables from the corn and toppings.
Per serving (assuming 12 servings, with about 2 tablespoons of dip plus toppings):
- Calories: approximately 180 to 220
- Protein: 12 to 14 grams
- Carbohydrates: 8 to 10 grams
- Fat: 12 to 14 grams
- Fiber: 2 grams
These numbers can vary depending on your specific ingredients and how much cheese you use. If you’re looking to lighten it up, use reduced-fat cream cheese and sour cream, or add extra vegetables.
Frequently Asked Questions
Can I make loaded taco dip in a slow cooker?
Absolutely! Assemble it in a slow cooker instead of a baking dish, set it to low, and let it warm for 1 to 2 hours. This is perfect for parties because it keeps the dip warm throughout the event. Just add the fresh toppings right before serving.
How long does loaded taco dip last?
Stored properly in an airtight container, it’ll keep in the refrigerator for up to 3 days. I wouldn’t recommend keeping it longer than that because the texture of the cream cheese starts to change.
Can I use ground turkey instead of ground beef?
Yes, ground turkey works great and makes the dip a bit leaner. Cook it the same way, and use the same amount of taco seasoning. The flavor will be slightly milder, but still delicious.
What if I don’t have taco seasoning packets?
You can make your own with 1 tablespoon chili powder, 1 teaspoon cumin, ½ teaspoon paprika, ½ teaspoon garlic powder, ½ teaspoon onion powder, and ¼ teaspoon cayenne pepper. Mix it together and use it the same way.
Is this dip gluten-free?
Yes, as long as you use gluten-free taco seasoning and serve it with gluten-free chips or vegetables. Most store-bought taco seasoning packets are gluten-free, but always check the label.
Final Thoughts
Making a loaded taco dip is one of those small kitchen moments that feels really rewarding. You’re not spending hours in the kitchen, but you’re creating something that brings people together and makes them happy. That’s what cooking is really about for me.
I hope you make this recipe soon—for a party, a game day, or just because you’re craving something warm and comforting. And I hope it becomes one of those dishes you make again and again, tweaking it each time until it’s perfectly yours. That’s how I feel about this loaded taco dip. It started as a recipe, but it’s become something I make with confidence and affection, knowing it’ll always turn out great.
Come back and let me know how yours turns out. I’d love to hear what you added or changed. Happy cooking!
Recipe Card
Name
Loaded Taco Dip
Ingredients
- 1 pound ground beef
- 1 packet (1.25 ounces) taco seasoning
- 8 ounces cream cheese, softened
- ½ cup sour cream
- ½ cup salsa (mild or medium)
- 1½ cups shredded cheddar cheese, divided
- ½ cup shredded mozzarella cheese
- 1 can (15 ounces) black beans, drained and rinsed
- 1 cup corn (fresh, frozen, or canned)
- ¼ cup diced red onion
- ¼ cup fresh cilantro, chopped (optional)
- 2 green onions, sliced
- 1 jalapeño, diced (optional)
- Tortilla chips for serving
Details
- Servings: 12 servings
- Course: Appetizer
- Cuisine: Mexican-inspired
Equipment
- Prep Time: 15 minutes
- Cook Time: 20 minutes
- Total Time: 35 minutes
Method
- Heat a large skillet over medium-high heat. Add ground beef and cook, breaking it up as it browns, for 5 to 7 minutes until fully cooked. Drain excess fat.
- Add taco seasoning and ¼ cup water to the beef. Stir well and simmer for 2 to 3 minutes until the sauce thickens.
- In a small bowl, mix softened cream cheese, sour cream, and salsa until smooth and well combined.
- Spread the cream cheese mixture into a 9-by-13-inch baking dish. Layer the seasoned beef over the cream cheese, then scatter black beans and corn on top. Sprinkle with cheddar and mozzarella cheese.
- Preheat oven to 350°F and bake for 15 to 20 minutes until cheese is melted and bubbly.
- Remove from oven and top with green onions, red onion, cilantro, and jalapeños.
- Serve warm with tortilla chips.
Nutrition (per serving)
- Calories: 200
- Protein: 13g
- Carbs: 9g
- Fat: 13g
- Fiber: 2g
Notes
Make-ahead: Assemble up to 24 hours ahead, cover, and refrigerate. Bake for 20 to 25 minutes when ready. Storage: Keep leftovers in an airtight container in the refrigerator for up to 3 days. Reheat gently in a 325°F oven for about 10 minutes. Freezing: You can freeze the assembled (unbaked) dip for up to 2 months; thaw in the refrigerator before baking.
Loaded Taco Dip
Ingredients
Method
- Heat a large skillet over medium-high heat. Add ground beef and cook, breaking it up as it browns, for 5 to 7 minutes until fully cooked with no pink remaining. Drain excess fat.
- Add taco seasoning packet and ¼ cup water to the cooked beef. Stir well and simmer for 2 to 3 minutes until the sauce thickens and coats the meat.
- In a small bowl, mix together softened cream cheese, sour cream, and salsa until smooth and well combined.
- Spread the cream cheese mixture evenly into a 9-by-13-inch baking dish. Layer the seasoned ground beef over the cream cheese, then scatter black beans and corn over the beef. Top with cheddar and mozzarella cheese.
- Preheat oven to 350°F and bake for 15 to 20 minutes until cheese is melted and bubbly around the edges.
- Remove from oven and immediately top with sliced green onions, diced red onion, cilantro, and jalapeños if using.
- Serve warm with tortilla chips surrounding the dip.