
Mexican Pizza Taco Style
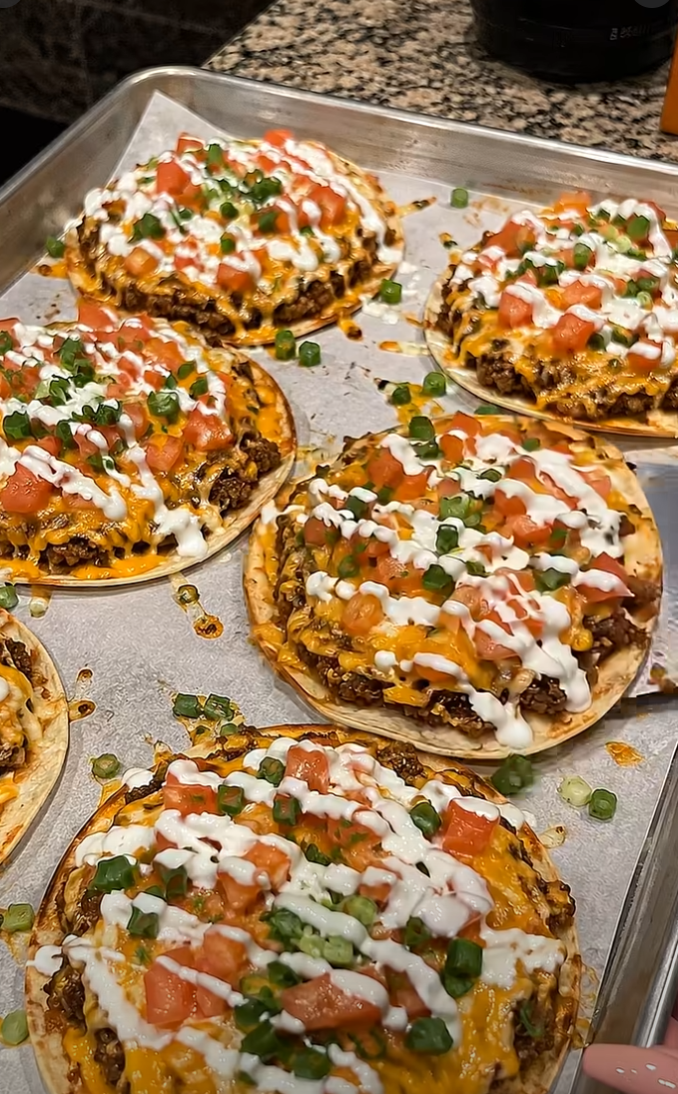
A Recipe That Started With My Taco Tuesday Leftovers
I’ll be honest—this Mexican Pizza Taco Style came about completely by accident on a Tuesday night when I had half a container of seasoned ground beef, a handful of tortillas, and absolutely zero inspiration for dinner. My kids were asking for something “fun,” my husband wanted tacos, and I was tired of the same old routine. So I did what I always do: I started throwing things together and hoped for the best.
What I pulled out of the oven twenty minutes later changed everything. Crispy tortilla bases, melted cheese with those gorgeous golden-brown edges, all the taco flavors we love but in this totally new format. My daughter called it “taco pizza,” and honestly, the name stuck. Now I make it at least twice a month, and my family actually requests it by name.
This isn’t some complicated fusion concept—it’s genuinely simple, deeply satisfying comfort food that tastes like you spent way more time on it than you actually did. The beauty of Mexican Pizza Taco Style is that it comes together in under thirty minutes, uses ingredients you probably already have, and somehow feels special enough for a weeknight dinner that actually impresses people.
Whether you’re a weeknight dinner warrior, someone learning to cook, or just tired of the same rotation, this recipe is for you. It’s forgiving, flexible, and absolutely delicious. Follow me on DianaCookingE on Pinterest for more recipes like this one that actually fit real life.
Why You’ll Love This Recipe
First, let’s talk about speed. I’m not exaggerating when I say you can have this on the table in less than half an hour. That includes prep and baking time. No complicated techniques, no ingredients you’ve never heard of, and no stress.
The texture is absolutely incredible—crispy on the outside where the tortilla meets the pan, soft and chewy in the middle, and then that melted cheese layer that gets all bubbly and slightly browned. Every single bite has something different going on, and that’s what keeps people coming back.
Then there’s the flavor profile. You get all those warm spices from the seasoned meat, the richness of melted cheese, the freshness of toppings like cilantro and lime, and that slight char from the oven. It’s balanced, it’s bright, and it doesn’t feel heavy even though it’s totally satisfying.
Finally—and this matters to me as a busy person—it’s endlessly customizable. Vegetarian? Skip the meat and load up on beans. Picky eaters? Let everyone build their own version. Meal prepping? The bases freeze beautifully. This recipe adapts to your life, not the other way around.
Ingredients for Mexican Pizza Taco Style
- 4 large flour tortillas (or corn if you prefer, though flour gives better crispness)
- 1 pound ground beef (or turkey, or skip for vegetarian)
- 2 tablespoons olive oil (divided)
- 1 packet taco seasoning (or 2 tablespoons homemade blend—see my note below)
- ¾ cup water
- 2 cups shredded cheddar cheese (or Mexican blend)
- 1 cup refried beans (or black beans, or skip entirely)
- ½ cup diced red onion
- 1 jalapeño, sliced thin (optional, but I love the heat)
- ½ cup fresh cilantro, chopped
- ¼ cup sliced black olives
- Salt and pepper to taste
- Lime wedges for serving
- Optional toppings: sour cream, salsa, avocado, diced tomato
Diana’s Tip: If you want to skip the packet seasoning, mix together 2 tablespoons chili powder, 1 tablespoon cumin, 1 teaspoon paprika, ½ teaspoon garlic powder, ½ teaspoon onion powder, and ½ teaspoon red pepper flakes. It tastes fresher and you control the heat level.
Optional Add-Ins and Variations
The wonderful thing about Mexican Pizza Taco Style is how much room you have to play. If you like things smoky, add a pinch of smoked paprika to your seasoning blend. If you want more vegetables, sauté some bell peppers and zucchini before layering.
For protein options, I’ve tested ground turkey (works great, slightly leaner), shredded rotisserie chicken (honestly delicious), and even crumbled chorizo for when I’m feeling extra. Black beans, pinto beans, or refried beans all work beautifully—or combine two types if you want more substance.
Cheese-wise, experiment freely. I rotate between sharp cheddar, Oaxaca, a Mexican blend, and even monterey jack. Some people swear by adding a layer of queso fresco on top after baking for a little briny contrast.
Step-by-Step Method
Step 1: Brown Your Meat and Build Flavor
Heat a large skillet over medium-high heat. Add your ground beef and cook, breaking it up as it browns, for about 5 to 7 minutes. You want it completely cooked through with no pink remaining. Drain off any excess fat if there’s a lot sitting in the pan—a little is fine and adds flavor, but too much makes things greasy.
Add your taco seasoning and water, then simmer for about 2 minutes. The sauce should coat the meat and smell absolutely incredible. This is where the magic starts.
What I Messed Up At First: I used to skip the draining step and wondered why my pizzas turned out soggy. That pooled fat has nowhere to go in the oven, and it makes the tortilla base get limp instead of crispy. Don’t skip it.
Step 2: Prep Your Oven and Baking Sheets
Preheat your oven to 400°F. While it’s heating, lightly brush two baking sheets with olive oil. This is crucial—it prevents sticking and helps your tortilla bases get crispy and golden.
Step 3: Build Your Bases
Place one tortilla on each prepared baking sheet. Brush the top lightly with olive oil (just a whisper of it—you don’t want them swimming). This helps them crisp up beautifully in the oven.
Spread a thin layer of refried beans on each tortilla, leaving about a half-inch border around the edges. This acts like a barrier between the tortilla and wet toppings, which keeps everything from getting soggy. It’s a small step that makes a huge difference.
Step 4: Layer Your Toppings
Divide the seasoned meat evenly among your four pizzas, spreading it in an even layer. Then scatter your diced red onion, jalapeño slices, and black olives across each one. Don’t go crazy with the toppings—you want enough flavor but not so much that things don’t cook evenly.
Top each pizza with ½ cup of shredded cheese. This might seem like a lot, but trust me, it melts down beautifully and creates those gorgeous browned edges I mentioned earlier.
Step 5: Bake Until Golden and Bubbly
Bake for 12 to 15 minutes, until the cheese is melted and starting to brown at the edges and the tortilla base is crispy and golden underneath. You’ll know it’s ready when you can smell that toasted cheese aroma filling your kitchen.
If you want extra crispy edges, bake for another 2 to 3 minutes, but watch it carefully so the cheese doesn’t burn. Every oven is different, so start checking around the 12-minute mark.
Step 6: Finish and Serve
Remove from the oven and let cool for just 2 minutes—this helps everything set slightly so it’s easier to handle. Top with fresh cilantro, a squeeze of lime juice, and whatever other toppings you love. Serve immediately with sour cream, salsa, or avocado on the side.
Common Mistakes to Avoid
Skipping the oil on the baking sheet: I mentioned this earlier, but it’s worth repeating. Without it, your tortilla sticks and steams instead of crisps. Not ideal.
Overloading the toppings: More isn’t always better. Too many wet ingredients (like salsa or tomatoes) make the base soggy. Keep toppings moderate and save the extra stuff for serving on the side.
Using cold tortillas straight from the package: They crack and break more easily. Let them sit out for a few minutes or microwave them for 30 seconds to warm them up first. They’re much more pliable.
Not draining the meat properly: Excess fat creates soggy spots. Take the extra 30 seconds to drain it well.
Opening the oven door constantly: Every time you peek, heat escapes and your baking time extends. Set a timer and trust the process.
My Tested Substitutions
For the tortillas: I’ve tested both flour and corn. Flour tortillas crisp up better and hold up to more toppings. Corn tortillas are more authentic but need careful handling—they can tear if you overload them. My advice? Use flour for this particular recipe.
For the meat: Ground turkey works beautifully and is leaner. Ground chicken is drier, so I’d add an extra tablespoon of olive oil to the pan. Shredded rotisserie chicken is fantastic and saves time. For vegetarian, skip the meat entirely and add an extra ½ cup of beans plus some sautéed peppers and mushrooms.
For the cheese: Any melting cheese works. I’ve used sharp cheddar, Oaxaca, Chihuahua, monterey jack, and even a blend of cheddar and mozzarella. Avoid fresh mozzarella—it gets too stringy and doesn’t brown nicely.
For the beans: Refried beans are my go-to, but mashed black beans work too. You could even use a layer of guacamole if you’re feeling fancy, though it’s better added after baking so it doesn’t get hot and break down.
[INTERNAL LINK: Check out my easy homemade taco seasoning recipe if you want to skip the packet]
How to Customize
The beauty of Mexican Pizza Taco Style is that it’s genuinely flexible. Building your own versions is actually more fun than following my exact recipe.
For heat lovers: Add more jalapeños, use hot salsa as a base layer, or sprinkle in some red pepper flakes. I’ve even added a tiny drizzle of hot sauce mixed into the meat.
For vegetable lovers: Sauté diced bell peppers, zucchini, corn, or mushrooms and layer them in. These should be cooked first so they don’t release too much water during baking.
For seafood lovers: I know this sounds wild, but shredded crab mixed with a little lime juice and cilantro is absolutely delicious. Use it instead of or alongside the meat.
For kids: Keep the toppings simple and mild. Let them build their own version with just cheese and meat, then add fresh toppings afterward.
Serving Ideas
Serve Mexican Pizza Taco Style with all the traditional taco sides. A big dollop of sour cream, fresh salsa (I love pico de gallo), sliced avocado, and lime wedges make perfect accompaniments.
I like to serve it with a simple side salad dressed with lime vinaigrette, or some cilantro-lime rice if I’m feeling like making it a more complete meal. A cold margarita or Mexican beer pairs beautifully if you’re in the mood.
For a lighter meal, serve smaller portions with lots of fresh toppings and salsa. For a heartier dinner, add some Mexican rice and black beans on the side.
Meal Prep and Storage
These pizzas are best eaten fresh and hot, but you can definitely prep components ahead. The seasoned meat keeps in the fridge for up to 3 days, and the unbaked pizzas can be assembled on baking sheets, covered with plastic wrap, and refrigerated for up to 8 hours before baking. Just add a few extra minutes to the baking time if they’re cold.
Leftovers keep in an airtight container in the fridge for about 2 days. Reheat in a 350°F oven for about 5 minutes until warmed through. The microwave works in a pinch but makes the crust less crispy.
You can also freeze the unbaked pizzas on a baking sheet, then transfer them to a freezer bag once frozen. Bake straight from frozen, adding about 5 extra minutes to the cooking time.
Nutritional Breakdown
Per serving (1 pizza, based on 4 servings):
- Calories: approximately 520
- Protein: 32g
- Carbohydrates: 28g
- Fat: 32g
- Fiber: 3g
These numbers assume you’re using the ingredients as listed. Variations will change the nutritional content—using turkey instead of beef lowers the fat and calories, for example, while adding extra vegetables increases fiber.
Frequently Asked Questions
Can I make Mexican Pizza Taco Style ahead of time?
Absolutely. Assemble the pizzas on baking sheets, cover with plastic wrap, and refrigerate for up to 8 hours. Bake when ready, adding a couple extra minutes since they’ll be cold. The unbaked pizzas also freeze beautifully for up to 3 months.
What if I don’t have taco seasoning?
Make your own blend with chili powder, cumin, paprika, garlic powder, onion powder, and red pepper flakes. I’ve included the exact measurements in the ingredients section. It actually tastes better and fresher than the packet.
Can I use corn tortillas instead of flour?
Yes, but they’re more delicate. Warm them first so they’re pliable, don’t overload them with toppings, and handle them gently. Flour tortillas are easier to work with and crisp up better, but corn is more traditional if that matters to you.
How do I make this vegetarian?
Skip the meat and add an extra ½ cup of beans, plus sautéed vegetables like peppers, zucchini, mushrooms, or corn. Make sure your beans are seasoned well with cumin, chili powder, and lime juice so they carry the flavor.
Why is my pizza coming out soggy?
This usually happens because of excess moisture from the meat, too many wet toppings, or not enough oil on the baking sheet. Drain your meat well, don’t overload toppings, and make sure you’re brushing the tortilla with oil before adding anything.
Final Thoughts
Mexican Pizza Taco Style has become one of those recipes I make when I want something delicious but don’t have a lot of time or energy. It’s the kind of dinner that tastes way more impressive than it actually is, which is honestly my favorite type of recipe to share.
What I love most about this dish is how it brings people together. My family gathers around the table, everyone customizes their own version with different toppings, and suddenly we’re all talking and laughing instead of eating in silence. That’s what cooking is really about for me.
I hope you give this a try and make it your own. Add your favorite toppings, experiment with different cheeses and proteins, and don’t be afraid to mess with it. The best recipes are the ones that become part of your regular rotation, not because they’re perfect, but because they’re perfect for your life.
Let me know how it turns out if you make it. I love hearing what you create in your kitchen.
Happy cooking,
Diana
—
Recipe Card
Mexican Pizza Taco Style
Ingredients
Method
- Heat a large skillet over medium-high heat. Add ground beef and cook, breaking it up as it browns, for 5 to 7 minutes until completely cooked through. Drain excess fat from the pan.
- Add taco seasoning and water to the meat, then simmer for about 2 minutes until the sauce coats the meat evenly.
- Preheat oven to 400°F. Lightly brush two baking sheets with olive oil to prevent sticking.
- Place one tortilla on each prepared baking sheet. Brush the top lightly with olive oil, then spread a thin layer of refried beans on each tortilla, leaving a half-inch border around the edges.
- Divide the seasoned meat evenly among the four pizzas, spreading in an even layer. Scatter diced red onion, jalapeño slices, and black olives across each pizza. Top each with ½ cup shredded cheese.
- Bake for 12 to 15 minutes until the cheese is melted and starting to brown at the edges and the tortilla base is crispy and golden underneath.
- Remove from oven and let cool for 2 minutes. Top with fresh cilantro and a squeeze of lime juice.
- Serve immediately with sour cream, salsa, or avocado on the side.