
Classic Baked Macaroni and Cheese
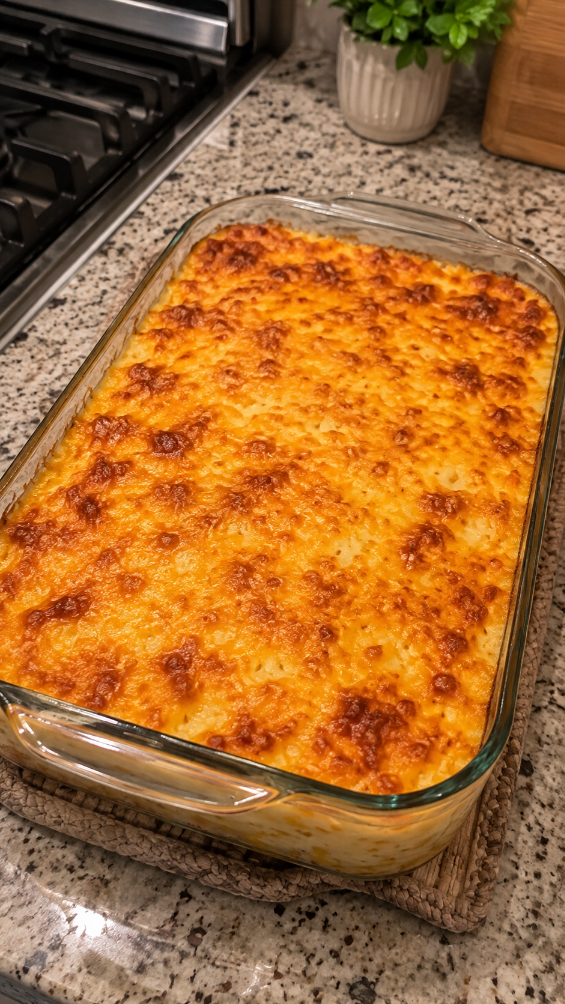
There’s something about the smell of mac and cheese baking in the oven that stops me in my tracks every single time. It’s creamy, it’s cheesy, it’s golden on top, and it fills your kitchen with this warm, comforting aroma that makes everyone come running to the dinner table. I’ve been making classic baked macaroni and cheese for years now, and honestly, it never gets old.
I grew up watching my grandmother make this dish on Sunday afternoons. Her version was simple—no fancy ingredients, no pretense—just good butter, real cheese, and pasta cooked until it was tender enough to fork through easily. She’d pour it into a ceramic baking dish, top it with breadcrumbs, and slide it into the oven. When it came out, the edges would be slightly crispy and brown, the center still creamy and rich. That’s the version I’m sharing with you today, because it’s the one that actually works, and it’s the one people keep asking me to make.
This recipe isn’t complicated. It doesn’t require you to hunt down obscure cheeses or special equipment. What it does require is patience, good ingredients, and a little attention to detail—which I’ll walk you through step by step. Whether you’re cooking for your family on a Tuesday night or bringing this to a potluck, classic baked macaroni and cheese is always the right choice.
If you love this kind of honest, straightforward cooking, I’d love to have you follow me on DianaCookingE on Pinterest where I share recipes like this one regularly. Let’s get started.
Why You’ll Love This Recipe
This isn’t a fussy recipe. It’s built on the principle that good mac and cheese should taste like mac and cheese—creamy, cheesy, and deeply satisfying. I use a combination of sharp cheddar and a little bit of gruyere for depth, but you can absolutely stick with cheddar alone if that’s what you have.
The texture is what really sets this apart. The pasta stays tender without turning mushy. The cheese sauce clings to every piece without being gluey. And that toasted breadcrumb topping? It gives you a little contrast and crunch that keeps things interesting.
This recipe also scales beautifully. Make it for four people, or double it for a crowd. It holds well, reheats without fussing, and tastes just as good on day two as it does fresh from the oven.
Ingredients
- 1 pound elbow macaroni
- 4 tablespoons unsalted butter
- 3 tablespoons all-purpose flour
- 3 cups whole milk, warmed
- 3 cups sharp cheddar cheese, shredded
- 1 cup gruyere cheese, shredded
- 1 teaspoon salt
- 1/2 teaspoon black pepper
- 1/4 teaspoon cayenne pepper (optional, but I recommend it)
- 1/2 teaspoon dry mustard powder
- 1/4 teaspoon nutmeg
- 1 cup panko breadcrumbs
- 2 tablespoons melted butter (for topping)
- 2 tablespoons fresh parsley, chopped (optional)
Diana’s Tip: Warm your milk before you add it to the roux. Cold milk hitting hot butter and flour causes lumps, and lumpy sauce is nobody’s friend. I learned this the hard way about fifteen years ago and never made that mistake twice.
Diana’s Tip: Buy your cheese in blocks and shred it yourself. Pre-shredded cheese has anti-caking agents that prevent it from melting as smoothly. The difference is noticeable, I promise.
Optional Add-Ins and Variations
This is where you can make the recipe your own without breaking what already works. A handful of crispy bacon bits stirred in at the end adds smoke and salt. Some people love a tablespoon of Dijon mustard mixed into the sauce for tang. I’ve added everything from roasted jalapeños to caramelized onions, and each one shifts the flavor in an interesting way.
If you want something a little different, try mixing in some smoked gouda or a sharp white cheddar. You can also add steamed broccoli or cauliflower to make it a complete meal in one dish, though I usually serve those on the side so people can choose.
Step-by-Step Method
Step 1: Cook the pasta
Bring a large pot of salted water to a boil. Add your elbow macaroni and cook it about one minute less than the package directions—you want it to have a tiny bit of firmness still. This matters because the pasta will continue cooking in the oven. Drain it well, but don’t rinse it. That starch on the outside helps the sauce stick.
Step 2: Make the roux
In a large saucepan or Dutch oven, melt your butter over medium heat. Once it’s foaming, add the flour and whisk constantly for about two minutes. You’re cooking out the raw flour taste, and the mixture should smell nutty and toasted. This is your roux, and it’s the base of everything.
Diana’s Tip: Don’t walk away during this step. Roux burns fast, and burned roux tastes bitter. Stay there, whisk, and keep the heat at medium.
Step 3: Add the milk slowly
Pour your warm milk in gradually while whisking constantly. Start with about a quarter of it, whisk until it’s smooth, then add more. This prevents lumps from forming. Keep whisking until all the milk is incorporated and you have a smooth, pourable sauce. This should take about three to four minutes.
Step 4: Season and add the cheese
Reduce the heat to medium-low. Add your salt, black pepper, cayenne, mustard powder, and nutmeg. Stir well. Now add your shredded cheddar and gruyere in handfuls, stirring after each addition until it’s completely melted. The sauce should be smooth, silky, and deeply cheesy. Taste it and adjust seasoning if needed.
What I Messed Up At First: I used to add the cheese all at once, and it would clump up. Adding it gradually and stirring between additions keeps everything smooth and emulsified. Your future self will thank you for this.
Step 5: Combine pasta and sauce
Add your cooked, drained pasta to the cheese sauce and fold everything together gently but thoroughly. Every piece of pasta should be coated. Pour the mixture into a buttered 9-by-13-inch baking dish. If you’re making this ahead, you can stop here and refrigerate it for up to 24 hours.
Step 6: Make the topping
In a small bowl, mix your panko breadcrumbs with the two tablespoons of melted butter and a pinch of salt. Toss it with a fork until the breadcrumbs are evenly moistened. Spread this mixture evenly over the top of your mac and cheese.
Step 7: Bake
Preheat your oven to 350°F. Bake the mac and cheese for 25 to 30 minutes, until the top is golden brown and crispy, and you can see the sauce bubbling at the edges. If you’re baking it straight from the fridge (not room temperature), add five to ten minutes to the baking time.
Let it rest for five minutes before serving. This helps it set slightly so it’s easier to scoop and serve.
Common Mistakes to Avoid
Overcooking the pasta: If you cook the pasta all the way through according to package directions, it’ll turn to mush in the oven. Cook it one minute under, always.
Using cold milk: This causes lumps in your sauce. Warm milk incorporates smoothly into your roux every time.
Skipping the resting time: Five minutes after it comes out of the oven might feel like forever, but it helps the dish set and makes it way easier to serve.
Not seasoning enough: Mac and cheese needs salt and a little heat to taste like itself. Taste as you go and don’t be shy.
Using pre-shredded cheese: Those anti-caking agents really do make a difference. Block cheese melts smoother and creates a better texture.
My Tested Substitutions
For the cheese: You can use all sharp cheddar if gruyere isn’t available. You can also swap in fontina, smoked gouda, or even a mix of whatever good melting cheese you have on hand. I’d avoid anything too soft or crumbly.
For the milk: Half-and-half makes it richer but also heavier. Heavy cream makes it almost decadent. Whole milk is my sweet spot for balance. I don’t recommend skim or low-fat milk here—the fat is part of what makes this dish work.
For the breadcrumb topping: Panko is my go-to because it gets crispy. You can use regular breadcrumbs, crushed crackers, or even crushed potato chips. I’ve also made it without a topping at all when I’m in a hurry—it’s still delicious, just less textural contrast.
For the pasta shape: Elbow macaroni is traditional, but small shells, ditalini, or even small penne work beautifully. Avoid long pasta like spaghetti—it doesn’t hold the sauce as well.
How to Customize
If you want to make this your own, start with the base recipe and add one or two things. Crispy bacon bits are always welcome. A handful of sautéed mushrooms adds earthiness. Fresh thyme stirred into the sauce right before serving brings brightness.
For a spicier version, increase the cayenne to half a teaspoon and add a tablespoon of hot sauce to the cheese sauce. For something more elegant, add fresh tarragon or a touch of white wine.
You can also layer this with vegetables—sautéed spinach, roasted broccoli, or caramelized onions mixed into the pasta before baking. Just remember that wet vegetables release moisture, so don’t overdo it.
Serving Ideas
Serve this with a simple green salad dressed with lemon vinaigrette to cut through the richness. Roasted vegetables on the side work beautifully—I love roasted broccoli, Brussels sprouts, or green beans.
A crusty bread for soaking up any extra sauce is never a bad idea. If you’re serving this at a potluck or family gathering, pair it with something lighter like grilled chicken or baked fish.
For a casual weeknight dinner, honestly, I serve it with just a side salad and call it done. Sometimes the simplest meals are the best ones.
Meal Prep and Storage
This dish keeps beautifully in the refrigerator for up to four days in an airtight container. Reheat it gently in a 325°F oven for about 15 minutes, covered with foil so the top doesn’t dry out. You can also reheat individual portions in the microwave, though the texture stays better in the oven.
You can also freeze unbaked mac and cheese for up to three months. Assemble it completely, cover it tightly with plastic wrap and foil, and freeze. Bake it straight from frozen, adding 15 to 20 minutes to the baking time. It won’t have quite the same crispy top, but it’ll still taste wonderful.
I don’t recommend freezing it after it’s been baked, as the texture changes and it tends to get a bit watery when thawed.
Nutritional Breakdown
This recipe makes about 8 servings. Per serving, you’re looking at roughly 520 calories, 28 grams of protein, 48 grams of carbohydrates, 22 grams of fat, and 2 grams of fiber. These numbers can shift depending on your exact cheeses and whether you add mix-ins.
This is a rich, indulgent dish, and it’s meant to be. It’s not an everyday meal for most people, but it’s absolutely worth having when you want comfort food that actually comforts you.
Frequently Asked Questions
Can I make this ahead of time?
Yes. Assemble the entire dish up to 24 hours ahead, cover it, and refrigerate. Add five to ten minutes to the baking time since it’ll be cold. You can also bake it, let it cool, and reheat it gently in the oven.
Why is my mac and cheese grainy or separated?
This usually happens when the cheese is added too quickly or the heat is too high. The proteins in the cheese seize up and separate from the fat. Make sure you’re adding cheese gradually and keeping the heat at medium-low. Warming your milk before adding it also prevents this.
Can I use evaporated milk instead of regular milk?
You can, though the flavor will be slightly different—a bit more concentrated and caramelized. It works fine if that’s what you have, but I prefer the cleaner taste of regular whole milk.
What if I don’t have gruyere cheese?
Use all sharp cheddar. You’ll lose a little depth of flavor, but it’ll still be delicious. You could also use fontina, smoked gouda, or any good melting cheese you like.
How do I prevent the top from burning while the inside stays cold?
If your oven runs hot, cover the dish loosely with foil for the first 15 minutes, then remove it for the last 10 to 15 minutes so the top can brown. You can also lower the oven temperature to 325°F and bake a bit longer.
Final Thoughts
Classic baked macaroni and cheese is one of those recipes that reminds me why I love cooking in the first place. It’s not about impressing anyone with fancy techniques or hard-to-find ingredients. It’s about taking simple, good things and combining them in a way that makes people happy.
I hope you make this version and that it becomes something you make regularly. Maybe it’ll remind you of someone you love, or maybe it’ll start a new tradition in your own kitchen. Either way, you’re making something real and delicious, and that’s what counts.
Let me know how it turns out. I’d love to hear if you added anything special or if you made it exactly as written. That’s what cooking is really about—sharing food and stories with the people we care about.
[INTERNAL LINK: Easy Weeknight Dinner Ideas]
[INTERNAL LINK: Best Cheese for Cooking]
Recipe Card
Name
Classic Baked Macaroni and Cheese
Ingredients
- 1 pound elbow macaroni
- 4 tablespoons unsalted butter
- 3 tablespoons all-purpose flour
- 3 cups whole milk, warmed
- 3 cups sharp cheddar cheese, shredded
- 1 cup gruyere cheese, shredded
- 1 teaspoon salt
- 1/2 teaspoon black pepper
- 1/4 teaspoon cayenne pepper
- 1/2 teaspoon dry mustard powder
- 1/4 teaspoon nutmeg
- 1 cup panko breadcrumbs
- 2 tablespoons melted butter (for topping)
- 2 tablespoons fresh parsley, chopped (optional)
Details
- Servings: 8 servings | Course: Main Dish | Cuisine: American
Equipment
- Prep Time: 15 minutes | Cook Time: 30 minutes | Total Time: 45 minutes
Method
- Cook elbow macaroni in salted boiling water one minute under package directions. Drain well without rinsing.
- Melt butter in a large saucepan over medium heat. Add flour and whisk constantly for two minutes until nutty-smelling.
- Gradually add warm milk while whisking constantly until smooth. Cook for three to four minutes, stirring often.
- Reduce heat to medium-low. Add salt, pepper, cayenne, mustard powder, and nutmeg. Stir well.
- Add shredded cheddar and gruyere in handfuls, stirring after each addition until completely melted and smooth.
- Fold cooked pasta into cheese sauce until every piece is coated. Pour into a buttered 9-by-13-inch baking dish.
- Mix panko breadcrumbs with two tablespoons melted butter and a pinch of salt. Spread evenly over top.
- Bake at 350°F for 25 to 30 minutes until top is golden brown and sauce bubbles at edges. Let rest five minutes before serving.
Nutrition (per serving)
- Calories: 520 | Protein: 28g | Carbs: 48g | Fat: 22g | Fiber: 2g
Notes
Store in an airtight container in the refrigerator for up to four days. Reheat gently in a 325°F oven for about 15 minutes, covered with foil. Can be frozen unbaked for up to three months; bake from frozen, adding 15 to 20 minutes to baking time. Warm milk prevents lumps in the cheese sauce. Cook pasta one minute under package directions to prevent mushiness.
Classic Baked Macaroni and Cheese
Ingredients
Method
- Cook elbow macaroni in salted boiling water one minute under package directions. Drain well without rinsing.
- Melt butter in a large saucepan over medium heat. Add flour and whisk constantly for two minutes until nutty-smelling.
- Gradually add warm milk while whisking constantly until smooth. Cook for three to four minutes, stirring often.
- Reduce heat to medium-low. Add salt, pepper, cayenne, mustard powder, and nutmeg. Stir well. Add shredded cheddar and gruyere in handfuls, stirring after each addition until completely melted.
- Add cooked drained pasta to cheese sauce and fold together gently but thoroughly. Pour into buttered 9-by-13-inch baking dish.
- Mix panko breadcrumbs with melted butter and a pinch of salt. Spread evenly over mac and cheese.
- Bake at 350°F for 25 to 30 minutes until top is golden brown and sauce bubbles at edges. Let rest 5 minutes before serving.