
Banana Pudding Dessert
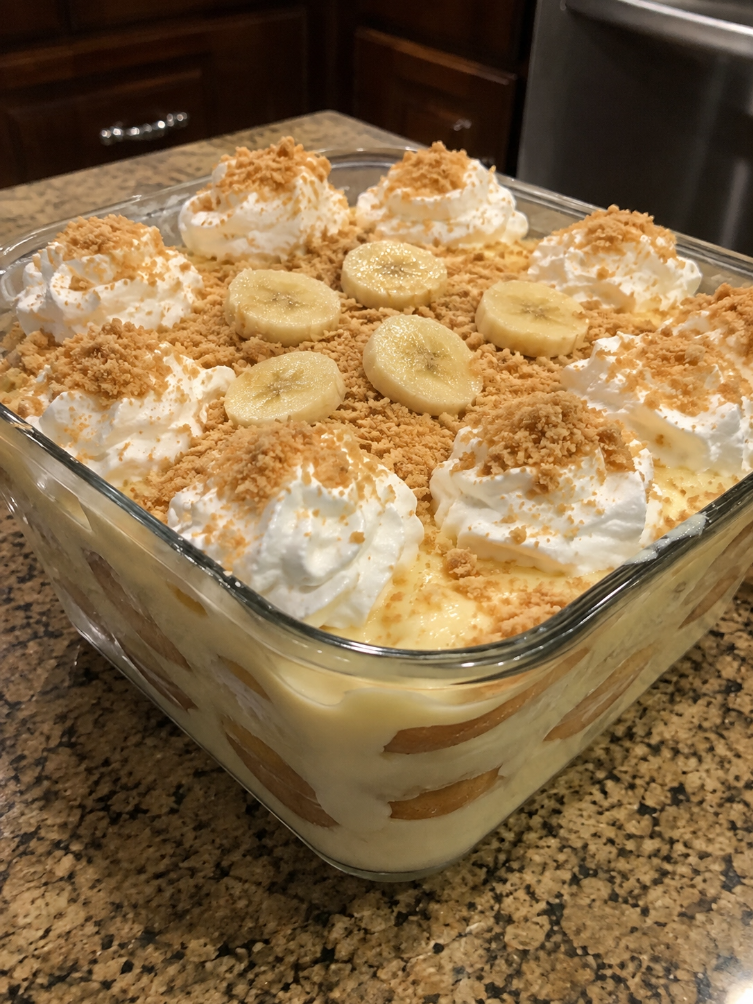
I still remember the first time my grandmother made banana pudding for a family dinner. I was maybe eight years old, sitting at her kitchen counter watching her layer vanilla wafers with sliced bananas and that silky custard. The smell alone—butter, vanilla, caramelized sweetness—had me completely mesmerized. She let me help arrange the top layer of wafers, and I felt like I was doing something genuinely important. That’s the magic of a good banana pudding dessert: it’s simple enough for a kid to help with, but it feels like you’re creating something special.
Over the years, I’ve made this recipe dozens of times. Sometimes it’s been for potlucks where it disappears before the main course is even served. Other times, it’s just been for my family on a random Tuesday because someone craved something comforting. And I’ve learned that the best banana pudding dessert isn’t about fancy ingredients or complicated techniques—it’s about using quality basics and not overthinking it.
This version is my go-to. It’s creamy, it’s not overly sweet, and it comes together in about 20 minutes of actual hands-on time. The pudding sets up beautifully overnight (though honestly, it’s pretty good after just a few hours), and it feeds a crowd without requiring you to spend all day in the kitchen. Whether you’re new to making desserts or you’ve been baking for years, this recipe works. I promise.
Follow me on DianaCookingE on Pinterest for more easy dessert recipes and kitchen tips.
Why You’ll Love This Recipe
First, there’s no baking involved. I know that sounds simple, but it’s genuinely freeing. You’re not stressing about oven temperature or worried that your dessert won’t rise properly. You’re just layering, chilling, and waiting for something delicious to happen.
Second, it’s forgiving. If your custard is slightly thinner than you expected, it still works beautifully. If your bananas are a bit softer than ideal, they actually blend into the layers in a really nice way. This isn’t a recipe that demands perfection.
Third, people actually eat it. I’ve brought this to potlucks where the fancy chocolate torte sat mostly untouched, but the banana pudding dessert was completely gone by dessert time. There’s something about the combination of creamy, fruity, and that gentle vanilla wafer crunch that just appeals to everyone.
And finally, it’s genuinely economical. You’re using ingredients you probably already have or can grab for just a few dollars. No specialty items, no expensive add-ons needed.
Ingredients for Banana Pudding Dessert
- 1 cup whole milk — I use regular 2% because that’s what I have on hand, and it works perfectly
- 1 cup heavy cream — this is what makes it rich and silky
- 1 package (3.4 oz) instant vanilla pudding mix — the classic choice, though I’ve experimented with others
- 1/2 cup granulated sugar
- 3 tablespoons unsalted butter
- 1 teaspoon vanilla extract — pure vanilla makes a real difference here
- 40 to 50 vanilla wafers — about one standard box; I usually grab a box and a half to be safe
- 4 medium bananas — ripe but still firm, not mushy
- Pinch of salt
Diana’s Tip: Don’t skip the salt. I know it seems odd in a dessert, but just a tiny pinch actually brightens all the flavors and keeps the pudding from tasting one-dimensional.
Optional Add-Ins and Variations
One of the best things about this recipe is how easily you can make it your own. Here are some tweaks I’ve tested:
- Toasted pecans or walnuts: Sprinkle about 1/2 cup on the final layer for crunch and nuttiness. Toast them first in a dry skillet for 3 to 4 minutes—it makes a huge difference.
- A splash of bourbon or rum: Add 1 to 2 tablespoons to the pudding mixture. It adds depth without making it taste boozy.
- Cinnamon swirl: Mix 1 teaspoon cinnamon with 2 tablespoons sugar and sprinkle between layers.
- Chocolate drizzle: Melt 2 ounces of dark chocolate and drizzle it over the top just before serving.
- Whipped cream topping: Whip 1 cup heavy cream with 2 tablespoons powdered sugar and vanilla, then dollop on top when you serve it.
Step-by-Step Method
Step 1: Make Your Pudding Base
Pour the milk and heavy cream into a large bowl. Whisk in the instant pudding mix until it’s completely smooth—no lumps. This usually takes about a minute of steady whisking. The mixture will start to thicken almost immediately, which is exactly what you want.
Diana’s Tip: Don’t walk away once you’ve added the pudding mix. The thickening happens fast, and if you let it sit for too long without stirring, you’ll end up with lumps that are hard to break up.
Step 2: Add Your Flavor
Stir in the vanilla extract and salt. Give it a good mix so everything is evenly distributed. The pudding should smell absolutely wonderful at this point—that’s how you know you’re on the right track.
Step 3: Prepare Your Dish
Grab a 9×13 inch baking dish (or something similar—I’ve used an 8×8 and it still works, just a bit taller). This is where the layering magic happens. You’ll want to work quickly once you start, so have everything ready: your pudding, your wafers, and your sliced bananas.
Step 4: Start Layering
Spread a thin layer of pudding on the bottom of your dish—just enough to cover the base. It should be maybe 1/4 inch thick. Now arrange vanilla wafers over that pudding layer, breaking them as needed to fit snugly. You’re aiming for coverage, not perfection. A few gaps are fine.
Step 5: Add Bananas
Slice your bananas into rounds about 1/4 inch thick. Arrange them over the wafer layer in a single layer. You don’t need to be precious about this—just get them distributed evenly. The bananas will soften as the dessert sits, and they’ll blend beautifully into the pudding.
Step 6: Continue Layering
Spread another layer of pudding over the bananas. Then another layer of wafers. Then more bananas. Keep going until you’ve used up most of your ingredients, ending with a pudding layer on top. You should have 3 to 4 layers total.
What I Messed Up At First: I used to try to make really thick, distinct layers. It looked pretty going into the fridge, but it didn’t hold together as well when serving. Now I make thinner layers, and the whole thing stays cohesive. It’s also easier to scoop.
Step 7: The Butter Layer (Optional but Recommended)
Melt your butter and brush or drizzle it over the very top. Then crush a handful of vanilla wafers and sprinkle them over the butter. This creates a little crust that’s absolutely delicious. It’s not essential, but it’s a small touch that people always notice.
Step 8: Chill
Cover your dish with plastic wrap and refrigerate for at least 4 hours, but ideally overnight. The wafers will soften, the pudding will set, and everything will meld together into something really special. You can make this in the morning and serve it that evening, or make it the day before.
Common Mistakes to Avoid
Using bananas that are too ripe: If your bananas are already soft and browning, they’ll turn to mush in the pudding. Aim for bananas that are yellow with maybe a few brown speckles, but still firm to the touch.
Skipping the chill time: I know it’s tempting to dig in right away, but the wafers really do need time to soften and absorb the pudding. If you serve it too soon, you’ll get crunchy wafers instead of that tender, cohesive texture.
Overmixing the pudding: Once you’ve whisked in the pudding mix, stop. Don’t keep stirring. You’re not making whipped cream. Extra stirring can make the pudding grainy or overly thick.
Packing the layers too tightly: Leave a little space between wafers so the pudding can flow through. Think of it like building with bricks—you need some give.
My Tested Substitutions
Pudding flavor: I’ve tried butterscotch, chocolate, and even banana pudding mix. They all work, though vanilla is my favorite because it lets the banana flavor shine. If you use chocolate, reduce it to 1 package (3 oz) instead of 3.4 oz so it’s not overwhelming.
Wafers: Nilla wafers are the classic, but I’ve used honey graham crackers and even shortbread cookies. The texture changes slightly, but it’s always good. Just make sure whatever you use isn’t too hard or too delicate.
Pudding mix brands: Store brands work just as well as name brands. I’ve tested this multiple times, and I genuinely can’t taste a difference. Save your money.
Dairy options: If you need to use something other than regular milk and cream, try evaporated milk mixed with regular milk, or use all heavy cream if you want it extra rich. Avoid skim milk—it won’t give you the right texture.
How to Customize
The beauty of this banana pudding dessert is that it’s a starting point. Want to make it more decadent? Add that chocolate drizzle or the toasted pecans. Want to make it lighter? Use low-fat pudding mix and reduce the heavy cream to 3/4 cup. Want to make it feel more grown-up? That splash of rum or bourbon really does change the vibe.
You could also make individual servings in small jars or cups if you’re serving a smaller group. Just layer as you would in the big dish, and you’ve got a pretty, portion-controlled dessert that people can grab and go.
[INTERNAL LINK: Check out my easy no-bake desserts for more recipes like this one]
Serving Ideas
Straight from the dish with a spoon is always perfect. But if you want to get a little fancier, scoop it into bowls and top with a dollop of whipped cream and maybe a sprinkle of cinnamon.
I’ve also served it with a small glass of sweet tea on the side, which sounds random but is absolutely the right pairing. The cold, creamy pudding and the cold, slightly sweet tea just work together.
For a potluck, I usually bring it in the dish I made it in, cover it with foil, and bring serving spoons. People will line up for this.
Meal Prep and Storage
This dessert actually gets better as it sits. Make it up to 2 days ahead, and it’ll be perfect. Keep it covered in the fridge the whole time.
If you have leftovers (which is rare in my house), they’ll keep for about 3 days refrigerated. The wafers will continue to soften, so by day 3 it’s almost more of a pudding situation than a layered dessert, but it’s still delicious.
I don’t recommend freezing this one. The texture changes too much when it thaws, and the bananas get weird. Just make it fresh when you need it—it’s quick enough.
Nutritional Breakdown
This recipe makes about 8 servings. Each serving contains approximately:
- Calories: 285
- Protein: 3g
- Carbohydrates: 42g
- Fat: 11g
- Fiber: 1g
- Sugar: 28g
Keep in mind these are estimates and can vary based on exact brands and portion sizes. If you add nuts or other mix-ins, adjust accordingly.
Frequently Asked Questions
Can I make this dessert ahead of time?
Absolutely. In fact, I recommend it. Make it the day before you need it, and it’ll be perfect. The flavors meld, the wafers soften to the right texture, and you’ve got one less thing to worry about the day of your event.
What if I don’t have instant pudding mix?
You can make pudding from scratch using cornstarch, milk, sugar, and vanilla, but it requires cooking and cooling. For this recipe, instant pudding is really the way to go. It’s quick, reliable, and honestly tastes great.
Can I use Greek yogurt instead of heavy cream?
You could try it, but the texture will be different—less creamy and more tangy. If you want to reduce the cream, use 3/4 cup cream and add 1/4 cup Greek yogurt. It works, but it’s not quite the same dessert.
How do I prevent the bananas from browning?
Slice them close to when you’re assembling the dessert. If you need to slice them earlier, toss them with a tiny bit of lemon juice—just a squeeze. The acid slows browning. But honestly, a little browning doesn’t hurt the flavor.
Is this recipe gluten-free?
Not as written, because vanilla wafers contain gluten. But you can absolutely use gluten-free wafers. I’ve done this, and it works beautifully. Just check that your pudding mix is gluten-free too.
Final Thoughts
This banana pudding dessert has been in my regular rotation for years, and I keep coming back to it for a reason. It’s not fussy. It doesn’t require special skills or hard-to-find ingredients. It makes people happy. And honestly, that’s what cooking is really about.
I hope you make this soon. I hope it reminds you of something warm and comforting, the way my grandmother’s version reminds me of being eight years old in her kitchen. And I hope, when you serve it to people you care about, they go back for seconds.
Let me know how it turns out. I love hearing what you think.
—
Banana Pudding Dessert
Ingredients
Method
- Pour milk and heavy cream into a large bowl and whisk in the instant pudding mix until completely smooth with no lumps, about one minute.
- Stir in vanilla extract and salt, mixing until evenly distributed.
- Spread a thin layer of pudding on the bottom of a 9x13 inch baking dish.
- Arrange vanilla wafers over the pudding layer, breaking them as needed to fit snugly.
- Slice bananas into 1/4 inch rounds and arrange them in a single layer over the wafers.
- Continue layering with pudding, wafers, and bananas until ingredients are used, ending with a pudding layer on top, creating 3 to 4 layers total.
- Melt butter and drizzle over the top, then crush a handful of vanilla wafers and sprinkle over the butter.
- Cover with plastic wrap and refrigerate for at least 4 hours, preferably overnight, before serving.