
Loaded Taco Dip Casserole
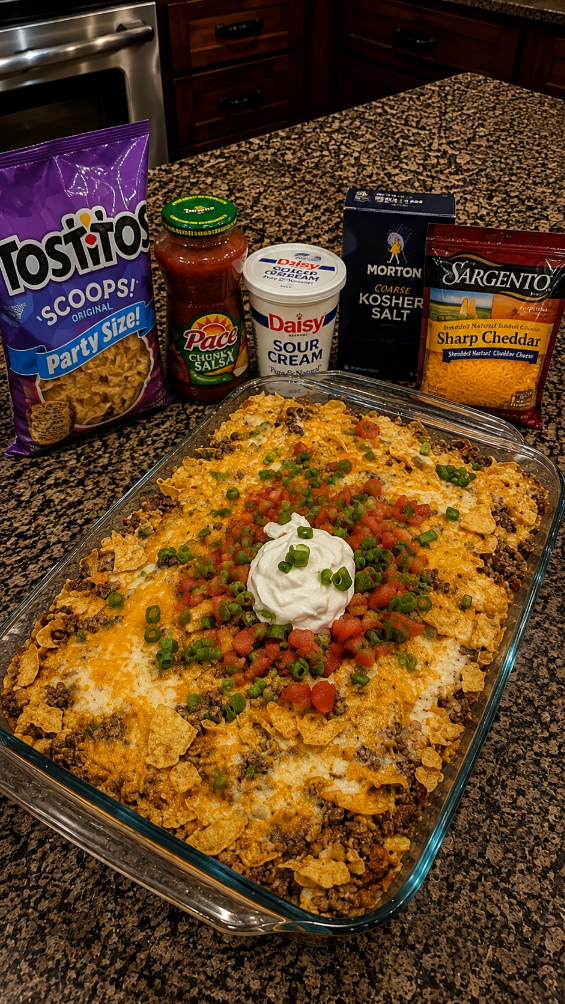
I’ll be honest with you—this loaded taco dip casserole came about on a Tuesday night when I was standing in front of my fridge, staring at leftover cream cheese, some ground beef, and a half-empty jar of salsa. My family was coming over for game night, and I didn’t want to serve the same seven-layer dip everyone’s been making since 1987. So I thought: what if I baked it? What if I turned all those beloved taco dip flavors into something warm, bubbling, and totally craveable straight from the oven?
That’s when the loaded taco dip casserole was born, and let me tell you, it changed everything about how I think about appetizers. Instead of layering everything in a cold bowl, I started building it in a casserole dish—cream cheese on the bottom, seasoned ground beef, then all the fun toppings. Thirty minutes in the oven later, and you’ve got something that’s warm, melty, and honestly impossible to stop eating.
This recipe is for anyone who loves tacos but wants to serve something a little different at a gathering. It’s perfect for game nights, potlucks, casual weeknight dinners, or when you’re hosting and want something that feels special but doesn’t require you to spend hours in the kitchen. The beauty of it is that it comes together in under an hour from start to finish, and most of that time is just the oven doing the work while you relax.
If you love easy, crowd-pleasing appetizers, follow me on DianaCookingE on Pinterest for more recipes like this one that taste impressive but don’t demand a culinary degree.
Why You’ll Love This Recipe
First, it’s genuinely foolproof. You’re not juggling multiple cold bowls or trying to keep things chilled while guests dig in. Everything happens in one casserole dish, and the oven handles the heavy lifting. The flavors are warm, comforting, and familiar—everyone recognizes the taco seasoning and cheese combination, so there’s no “what is this?” moment.
Second, it’s incredibly flexible. You can make it exactly as I’ve written it, or you can swap in whatever proteins, cheeses, or toppings you have on hand. I’ve made it with ground turkey when I was being health-conscious, with chorizo when I wanted more spice, and even with shredded chicken when I had leftovers. It always works.
Third—and this matters to me—it actually tastes like real food. There’s no weird gelatin, no mysterious ingredient list. It’s cream cheese, seasoned beef, cheese, salsa, and toppings. Things you recognize. Things that make sense together. That’s the kind of cooking I love.
Ingredients for Loaded Taco Dip Casserole
- 8 oz cream cheese, softened to room temperature
- 1 lb ground beef (or ground turkey)
- 1 packet (1.25 oz) taco seasoning, or 2 tablespoons homemade blend
- 3/4 cup salsa (mild or medium, depending on your heat preference)
- 1 1/2 cups shredded cheddar cheese, divided
- 1/2 cup shredded Monterey Jack cheese
- 1/4 cup sour cream
- 1/4 cup diced jalapeños (fresh or pickled)
- 1/4 cup sliced black olives
- 1/4 cup diced red bell pepper
- 2 tablespoons fresh cilantro, chopped (optional)
- Salt and pepper to taste
- Tortilla chips for serving
Diana’s Tip: Softening your cream cheese at room temperature is non-negotiable here. If you try to mix cold cream cheese into the casserole, you’ll end up with lumps. I learned this the hard way on my first attempt. Now I pull it from the fridge about 20 minutes before I start cooking, and everything blends beautifully.
Optional Add-Ins and Variations
This is where you make it yours. I love adding a can of black beans (drained and rinsed) for extra texture and protein. Some people swear by corn—I’ve done it, and it’s delicious. A handful of crispy bacon crumbles on top adds a smoky richness that’s hard to beat.
If you want to dial up the heat, add diced serrano peppers or a splash of hot sauce mixed into the cream cheese layer. For a lighter version, use Greek yogurt instead of some of the sour cream. You could even top it with crispy fried onions for a little textural contrast, though I usually keep mine simple so the main flavors shine through.
Step-by-Step Method
Step 1: Brown the meat and season it
Heat a skillet over medium-high heat. Add your ground beef and break it apart with a spoon as it cooks. You want it browned and crumbly, not clumped together. This takes about 5 to 7 minutes. Once it’s cooked through, drain any excess fat if there’s a lot pooling in the pan—a little is fine, but we don’t want it swimming.
Add your taco seasoning and about 1/4 cup of water (or follow your seasoning packet’s instructions). Stir it together and let it simmer for a couple of minutes until the liquid reduces and the meat smells absolutely incredible. This is where the magic starts.
Diana’s Tip: If you’re making your own taco seasoning, mix 2 tablespoons chili powder, 1 tablespoon cumin, 1 tablespoon paprika, 1 teaspoon garlic powder, 1 teaspoon onion powder, and 1/2 teaspoon cayenne. It’s fresher than a packet, and you control the heat level.
Step 2: Preheat and prepare your casserole dish
While your meat is cooking, preheat your oven to 350°F. Grab a 9×13-inch casserole dish (or similar size) and lightly grease it with cooking spray or a little butter. This prevents sticking and makes cleanup easier later.
Step 3: Mix your cream cheese base
In a bowl, combine your softened cream cheese, sour cream, salsa, and 1 cup of the shredded cheddar cheese. Mix until it’s smooth and well combined. Taste it—does it need more salt? A little more heat? Now’s the time to adjust. This base is the foundation of everything, so you want it tasting good on its own.
Step 4: Spread the base
Spread that cream cheese mixture evenly across the bottom of your prepared casserole dish. Don’t worry if it’s not perfectly smooth—it’ll even out as it bakes. This is your canvas.
Step 5: Add the seasoned beef
Spread your cooked, seasoned ground beef over the cream cheese layer. Try to distribute it evenly so every bite has meat in it. This is important for texture and flavor balance.
Step 6: Top with cheese and toppings
Sprinkle the remaining 1/2 cup of cheddar and all the Monterey Jack cheese over the beef. Then scatter your jalapeños, olives, and bell pepper across the top. Don’t be shy—this is called “loaded” for a reason.
Step 7: Bake until bubbly
Pop the casserole into your preheated oven for 25 to 30 minutes. You’re looking for the edges to start bubbling and the cheese on top to be melted and lightly golden. The cream cheese layer underneath will be warm and creamy, and the whole thing will smell like a taco truck exploded in the best way possible.
What I Messed Up At First: I used to pull it out too early, thinking it was done as soon as the cheese melted. But the magic really happens when you let it go those extra few minutes until the edges are bubbling vigorously. That’s when all the flavors meld together.
Step 8: Cool for a few minutes and garnish
Let it sit for about 5 minutes out of the oven. This lets everything set slightly so it’s easier to scoop without it being a runny mess. Sprinkle fresh cilantro on top if you’re using it, and serve immediately with tortilla chips.
Common Mistakes to Avoid
Using cold cream cheese: I mentioned this before, but it’s worth repeating. Cold cream cheese won’t blend smoothly and you’ll end up with a lumpy base. Give it 20 minutes on the counter.
Overcrowding with toppings: It’s tempting to pile everything on, but too many toppings can make it hard to bake evenly and make it difficult to scoop. Stick to the amounts I’ve listed, or add extra toppings only if you’re making a larger batch.
Not draining the cooked meat: Excess grease makes the whole thing greasy. Drain it properly, and you’ll have a much better texture.
Skipping the rest time: That 5 minutes after baking matters. It gives the cream cheese a chance to set up slightly, so you’re not serving soup.
My Tested Substitutions
Ground turkey: Works perfectly and makes it slightly lighter. Use the same amount and cooking method.
Greek yogurt instead of sour cream: You can replace all or half of the sour cream with Greek yogurt for a tangier, higher-protein version. The texture stays creamy.
Different cheeses: Try pepper jack for heat, or a mix of cheddar and Colby. Avoid anything too soft like brie—you want cheeses that melt well and hold their shape somewhat.
Salsa swap: Use pico de gallo mixed with a little lime juice for a fresher version, or go with a corn salsa for sweetness and texture.
[INTERNAL LINK: Check out my easy taco seasoning recipe for more homemade spice blends]
How to Customize
Make it vegetarian by swapping the ground beef for crumbled tofu or extra beans. Add a layer of refried beans under the cream cheese base for more substance. If you like it spicy, add jalapeños to the cream cheese mixture itself, not just on top.
Want to make it fancier for company? Top it with crispy tortilla strips and a dollop of guacamole right before serving. For a lower-carb version, serve it with bell pepper slices or cucumber rounds instead of chips.
Serving Ideas
Tortilla chips are the obvious choice, and honestly, they’re perfect. But I’ve also served this with bell pepper strips, cucumber slices, and even crispy pita chips when I wanted something a little different.
At a potluck, I transport it in the casserole dish and reheat it in a 325°F oven for about 10 minutes before serving. It travels beautifully and stays warm during the event.
For a casual dinner, I’ll serve it alongside a simple green salad and call it a meal. It’s substantial enough to stand on its own, especially if you’ve added beans or extra protein.
Meal Prep & Storage
You can assemble this casserole up to 24 hours ahead. Prepare it completely, cover it with plastic wrap, and refrigerate. When you’re ready to serve, just bake it as directed—it might take an extra 5 to 10 minutes since it’s starting cold.
Leftovers keep in an airtight container in the fridge for up to 3 days. Reheat in a 325°F oven for about 10 minutes, or microwave individual portions for 1 to 2 minutes. It won’t be quite as crispy as the first time, but it still tastes delicious.
You can also freeze unbaked casseroles for up to 2 months. Thaw overnight in the fridge before baking, then add 5 to 10 minutes to the bake time.
Nutritional Breakdown
This casserole is rich and indulgent—it’s meant to be an appetizer or casual meal, not a light side dish. Per serving (assuming 8 servings), you’re looking at roughly 280 to 320 calories, depending on your exact ingredients and how much you’re eating. The protein comes from the beef and cheese, making it fairly filling despite the portion size.
If you’re tracking macros, the main contributors are fat (from the cream cheese and cheese) and protein (from the beef and dairy). Carbs are minimal unless you’re eating it with chips.
Frequently Asked Questions
Can I make this in a slow cooker?
Yes. Assemble it in your slow cooker instead of a casserole dish, cover, and cook on low for 2 to 3 hours or on high for 1 to 1.5 hours. Stir it gently halfway through. It’ll be creamier this way, which some people love.
What if I don’t have Monterey Jack cheese?
Use all cheddar, or try Colby, Oaxaca, or even a mild white cheddar. Any melting cheese works. Just avoid anything too hard or too soft.
How far ahead can I make this?
Assemble it up to 24 hours ahead and refrigerate unbaked. If you’re baking it ahead, let it cool completely, then refrigerate for up to 3 days. Reheat gently before serving.
Is this gluten-free?
The casserole itself is naturally gluten-free. Just serve it with gluten-free chips or vegetable slices if that’s a concern for your guests.
Can I double this recipe?
Absolutely. Use two 9×13-inch casseroles or one large roasting pan. Bake time might be 5 to 10 minutes longer since there’s more volume. Just keep an eye on it and pull it out when the edges are bubbling and the top is golden.
Final Thoughts
This loaded taco dip casserole has become one of my go-to recipes because it’s reliable, delicious, and makes people genuinely happy. There’s something about warm, cheesy, savory food that brings people together, and this dish does exactly that.
The best part? You don’t need to be an experienced cook to pull it off. If you can brown some meat and mix cheese together, you can make this. And if something doesn’t go exactly according to plan—maybe your oven runs hot, or you added a little too much salsa—it’ll still taste wonderful.
I’d love to hear how yours turns out. Make it, feed your people, and enjoy those moments around the table. That’s what cooking is really about.
—
Loaded Taco Dip Casserole
Ingredients
Method
- Heat a skillet over medium-high heat. Add ground beef and break apart with a spoon as it cooks for 5 to 7 minutes until browned. Drain excess fat, then add taco seasoning and 1/4 cup water. Simmer for 2 minutes until liquid reduces.
- Preheat oven to 350°F. Lightly grease a 9x13-inch casserole dish with cooking spray.
- In a bowl, combine softened cream cheese, sour cream, salsa, and 1 cup of the shredded cheddar cheese. Mix until smooth and well combined. Taste and adjust seasoning as needed.
- Spread the cream cheese mixture evenly across the bottom of the prepared casserole dish.
- Spread the cooked, seasoned ground beef over the cream cheese layer, distributing evenly.
- Sprinkle the remaining 1/2 cup cheddar cheese and all the Monterey Jack cheese over the beef. Scatter jalapeños, olives, and bell pepper across the top.
- Bake for 25 to 30 minutes until the edges bubble and the cheese on top is melted and lightly golden.
- Let sit for 5 minutes out of the oven, then serve immediately with tortilla chips.