
Stuffed Cheesy Pepperoni and Sausage Bread
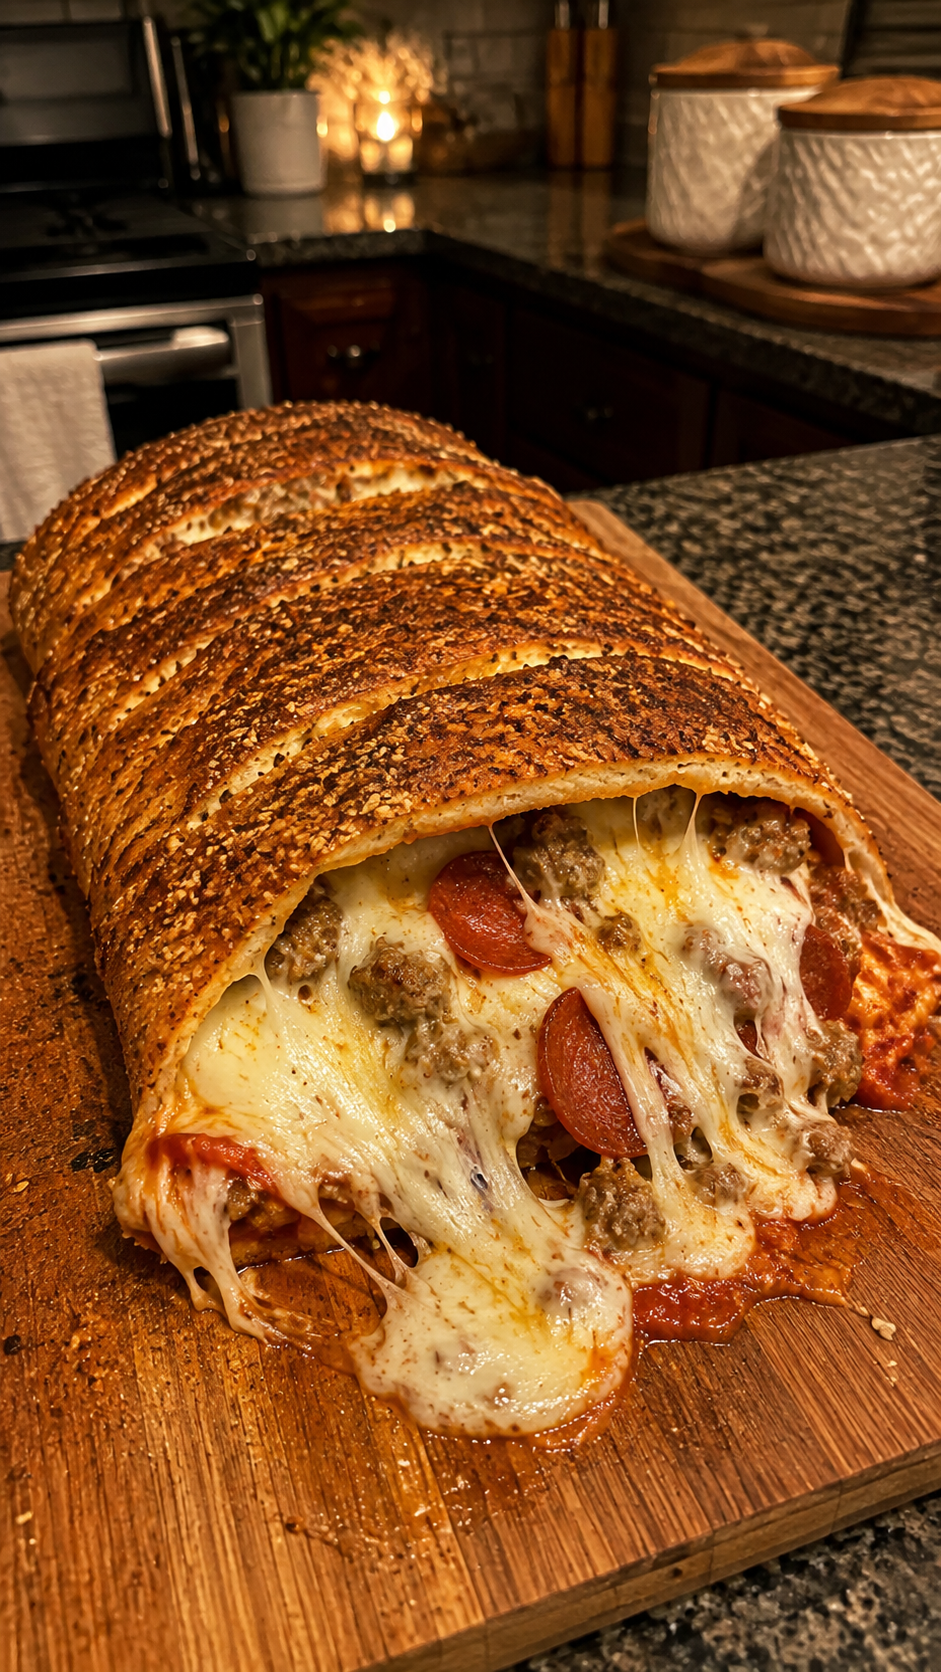
I remember the exact moment I craved this bread. It was a Friday night, I was scrolling through my phone waiting for dinner to cook, and I couldn’t stop thinking about the flavors I wanted: melty cheese, spicy pepperoni, savory sausage, all wrapped up in soft, pillowy bread. So I stopped scrolling and started experimenting in my kitchen.
What I landed on—this Stuffed Cheesy Pepperoni and Sausage Bread—became the thing my family now requests every other week. It’s not fancy or complicated, but it *feels* special when you slice into it and see that gorgeous filling all studded with meat and cheese. The bread is tender on the inside with crispy, golden edges. The filling is warm, gooey, and honestly a little addictive.
This recipe is for anyone who loves the comfort of homemade bread but wants something more interesting than a plain loaf. It’s perfect for game day gatherings, casual family dinners, or when you just want something hearty and satisfying without spending hours in the kitchen. I’ve made it dozens of times now, and I’m sharing exactly what I’ve learned—the tricks, the mistakes I’ve fixed, and the variations that work beautifully.
If you enjoy making bread at home, you’re going to love this one. And if bread-baking feels intimidating, I promise this recipe walks you through it in a way that makes sense. Follow me on DianaCookingE on Pinterest for more recipes like this one.
Why You’ll Love This Recipe
First, let’s talk about what makes this special. Unlike a regular bread recipe, this one has a real *purpose*—it’s not just carbs, it’s a complete, satisfying meal wrapped up in dough.
The filling is where the magic happens. You’re mixing cooked sausage, pepperoni, mozzarella, and a touch of cream cheese for richness. When you bite into a slice, you get that stretch of melted cheese, the slight spice from the pepperoni, and the savory depth of the sausage. It’s the kind of thing that makes people ask for seconds before they’ve even finished their first slice.
The bread itself is forgiving. I use a simple dough that comes together quickly and doesn’t require fancy techniques or a stand mixer. It rises while you prep the filling, so there’s no long waiting around. The whole process, from start to table, takes about two hours—and most of that is hands-off rising time.
It’s also incredibly versatile. You can make it exactly as written, or you can swap in different meats, cheeses, or herbs depending on what you have or what you’re craving that day.
Ingredients for Stuffed Cheesy Pepperoni and Sausage Bread
For the Dough:
- 3 cups all-purpose flour
- 1 packet (2¼ teaspoons) instant yeast
- 1 teaspoon salt
- 1 tablespoon sugar
- 1 tablespoon olive oil
- 1 cup warm water (around 110°F)
For the Filling:
- ½ pound Italian sausage (bulk or removed from casings)
- 1 cup pepperoni slices, roughly chopped
- 1½ cups shredded mozzarella cheese
- 4 ounces cream cheese, softened
- ¼ cup grated Parmesan cheese
- 1 teaspoon Italian seasoning
- ½ teaspoon garlic powder
- ¼ teaspoon red pepper flakes (optional, but I use them)
- Salt and black pepper to taste
For Assembly and Baking:
- 1 egg, beaten (for egg wash)
- 1 tablespoon water
- Extra mozzarella for topping (about ½ cup)
- Fresh Italian parsley for garnish (optional)
Diana’s Tip: Make sure your water is warm but not hot—if it’s too hot, it’ll kill the yeast and your dough won’t rise. I use the inside of my wrist to test it, like you would for a baby’s bath. It should feel pleasantly warm, not scalding.
Optional Add-Ins and Variations
One of my favorite things about this recipe is how easily you can make it your own. Here are some additions I’ve tested and loved:
- Fresh spinach: Wilt about 1 cup of fresh spinach and squeeze out excess moisture before adding to the filling. It adds color and nutrition without changing the flavor profile.
- Roasted red peppers: Chop up about ½ cup and fold them in. They add sweetness and a slight tang that plays beautifully with the meat and cheese.
- Caramelized onions: If you have time, caramelize ½ cup of sliced onions and add them to the filling. It takes the flavor up a notch.
- Different cheeses: I’ve used provolone, smoked gouda, and fontina with great results. Mix and match based on what you like.
- Hot Italian sausage: If you like more heat, use the spicy version instead of mild. The red pepper flakes will complement it perfectly.
Step-by-Step Method
Step 1: Make the Dough
In a large bowl, combine your flour, yeast, salt, and sugar. I like to whisk these dry ingredients together first so the yeast is evenly distributed. Pour in the warm water and olive oil, then stir everything together until a shaggy dough forms. You might need to use your hands at the end—that’s totally normal.
Turn the dough onto a lightly floured surface and knead for about 8 to 10 minutes. You’re looking for it to become smooth and slightly elastic. It won’t be perfectly smooth like a brioche dough, but it should hold together and bounce back gently when you poke it. If you have a stand mixer, you can do this on low speed with the dough hook for about 6 minutes.
Diana’s Tip: Don’t skip the kneading step. I did once, thinking it would save time, and ended up with a dense, tough loaf. Those 10 minutes of kneading develop the gluten, which gives your bread structure and that beautiful chewy texture.
Step 2: First Rise
Oil a bowl lightly and place your dough in it, turning to coat all sides. Cover with a damp kitchen towel or plastic wrap and let it rise in a warm, draft-free spot for about 1 hour, or until it’s roughly doubled in size. I usually set mine on top of the microwave, which tends to be a warm spot in my kitchen.
Step 3: Prepare the Filling
While the dough rises, brown the sausage in a large skillet over medium-high heat. Break it into small pieces as it cooks—you want it crumbly, not in chunks. Once it’s cooked through and no longer pink, drain off excess fat and set it aside to cool slightly.
In a bowl, combine the cooled sausage, chopped pepperoni, mozzarella, cream cheese, Parmesan, Italian seasoning, garlic powder, red pepper flakes, salt, and pepper. Mix it all together until everything is evenly distributed. Taste it and adjust the seasonings if needed. The filling should taste slightly bold because it’s going to be inside the bread.
What I Messed Up At First: I added the cream cheese straight from the fridge once, and it didn’t mix smoothly—it just clumped up. Now I always let it sit on the counter for 15 minutes first. It makes a huge difference in how easily everything combines.
Step 4: Shape and Fill
Once your dough has risen, punch it down gently and turn it out onto a floured surface. Roll it out into a rectangle, roughly 14 by 10 inches. The exact dimensions don’t matter too much, but you want it thin enough that it’s easy to work with but thick enough that it won’t tear.
Spread your filling evenly over the dough, leaving about ½ inch of space around the edges. This keeps the filling from squishing out when you roll it. Starting from one of the long sides, roll the dough tightly, like you’re making a cinnamon roll, and pinch the seam closed.
Place the roll seam-side down on a parchment-lined baking sheet. Curve it into a gentle U-shape or leave it straight—both work beautifully. Cover it loosely with plastic wrap and let it rise again for about 45 minutes to 1 hour, until it’s puffy and jiggly when you gently shake the pan.
Step 5: Egg Wash and Toppings
Preheat your oven to 375°F. Whisk together the egg and water to make an egg wash, then brush it all over the top of your dough. Sprinkle the extra mozzarella generously over the top—this is what gives you those beautiful golden, cheese-crusted edges.
Step 6: Bake
Bake for 25 to 30 minutes, until the bread is golden brown and the cheese on top is melted and starting to brown slightly. The internal temperature should reach about 190°F if you have a thermometer. If the top is browning too quickly but the bread still feels soft, tent it loosely with foil for the last 10 minutes.
Let it cool on the baking sheet for 5 minutes, then transfer it to a cutting board. Wait another 5 minutes before slicing—I know it’s hard, but this lets the cheese set slightly so it doesn’t all leak out when you cut into it.
Common Mistakes to Avoid
Using water that’s too hot: If your water is hotter than 120°F, it’ll kill the yeast and your dough won’t rise. Test it on your wrist—it should feel warm but not hot.
Not kneading enough: Skipping or rushing through the kneading step results in dense, tough bread. Those 8 to 10 minutes really matter.
Overfilling: I used to pile the filling on thick, thinking more is better. It actually makes it harder to seal the dough and the filling leaks out during baking. A generous but even layer works best.
Slicing too soon: I get it—the smell is incredible and you want to dig in. But if you slice while it’s still steaming hot, the cheese will pull apart and it won’t hold together nicely. Give it at least 10 minutes.
Skipping the second rise: This step is important. It gives the dough time to relax and rise again after you’ve shaped it, which results in a lighter, airier crumb.
My Tested Substitutions
Different meats: I’ve made this with ground beef, ground turkey, and even pancetta. They all work, though the flavor profile changes. Ground turkey makes it lighter; pancetta makes it more luxurious.
No pepperoni: Use sliced salami, capicola, or even bacon. The idea is the same—you want something salty and savory to balance the cheese.
Dairy-free filling: Use dairy-free mozzarella and a dairy-free cream cheese alternative. The texture will be slightly different, but it still tastes good. I’d recommend using a bit more seasoning since these alternatives can be milder.
Whole wheat dough: You can replace up to 1 cup of the all-purpose flour with whole wheat flour. The bread will be denser and have a nuttier flavor. Any more than that and it becomes quite heavy.
Faster rise: If you’re short on time, you can use a warm oven to speed up rising. Turn your oven on to 200°F for 5 minutes, then turn it off. Place your dough inside with the door closed, and it’ll rise faster.
How to Customize
The beauty of this recipe is that it’s a framework, not a rigid formula. Want it spicier? Add more red pepper flakes or use hot sausage. Want it more garlicky? Increase the garlic powder or add fresh minced garlic to the filling. Like herbs? Fresh basil or oregano scattered through the filling adds brightness.
You can also make individual portions by dividing the dough into smaller pieces and filling them separately. They’ll bake faster—about 15 to 18 minutes—and make great handheld meals or appetizers.
Diana’s Tip: If you want to make this ahead, you can prepare the dough through the first rise, refrigerate it overnight, then shape and fill it the next day. Just add 15 to 20 minutes to the second rise since it’ll be starting cold.
Serving Ideas
This bread is substantial enough to be a meal on its own, especially with a simple side salad or some roasted vegetables. I usually serve it with a crisp green salad dressed in a light vinaigrette—the acidity cuts through the richness of the cheese and meat beautifully.
It’s also fantastic for entertaining. Slice it into smaller pieces and serve it as an appetizer or part of a charcuterie-style spread. People love it because it feels homemade and special, but it’s actually pretty easy to make.
Leftover slices are wonderful reheated in the oven at 325°F for about 8 minutes, or even cold the next day if you like it that way. I’ve been known to eat cold slices straight from the fridge as a snack.
Meal Prep and Storage
Room temperature: Store cooled bread in an airtight container at room temperature for up to 2 days. After that, it starts to dry out.
Refrigerator: Wrapped well, it’ll keep for up to 4 days in the fridge. Reheat gently in the oven.
Freezer: You can freeze the baked bread for up to 3 months. Wrap it tightly in plastic wrap and then foil. Thaw overnight in the fridge and reheat in a 325°F oven for about 15 minutes.
Make-ahead tip: You can also freeze the dough after the first rise. Let it cool completely, wrap it tightly, and freeze for up to 1 month. Thaw overnight in the fridge, then proceed with shaping and the second rise as normal.
[INTERNAL LINK: Easy Bread Recipes for Beginners]
Nutritional Breakdown
Per serving (assuming 8 servings):
- Calories: approximately 420
- Protein: 18g
- Carbohydrates: 32g
- Fat: 24g
- Fiber: 1g
Keep in mind that this is an estimate and can vary based on the exact ingredients and brands you use. If you’re tracking macros closely, I’d recommend calculating based on your specific products.
Frequently Asked Questions
Can I make this without a second rise?
Technically yes, but I wouldn’t recommend it. The second rise is what makes the bread light and airy. Without it, you’ll end up with denser, tougher bread. If you’re really short on time, you can reduce it to 30 minutes instead of 45 to 60 minutes, but don’t skip it entirely.
What if my dough isn’t rising?
This usually means your yeast is dead or your environment is too cold. Make sure your water was the right temperature (around 110°F) and that your yeast hasn’t expired. If your kitchen is cold, try placing the dough in a warmer spot—above the microwave, in a turned-off oven with the light on, or even in a cooler with warm water bottles around it.
Can I use instant yeast and active dry yeast interchangeably?
Yes, they work the same way in this recipe. Instant yeast is just slightly finer, so it hydrates a tiny bit faster, but the results are essentially identical. Use the same amount either way.
Is this bread gluten-free?
Not as written, but you can make it with a good quality gluten-free all-purpose flour blend. Look for one that includes xanthan gum. You might need to add slightly less water since gluten-free flours absorb liquid differently. Start with ¾ cup of water and add more if needed until the dough comes together.
What’s the best way to reheat leftovers?
Wrap your slice in foil and warm it in a 325°F oven for about 8 minutes. This keeps it from drying out. You can also microwave it, but it’ll be a bit softer and less crispy. Microwave for 30 to 45 seconds on high power.
Final Thoughts
Making this Stuffed Cheesy Pepperoni and Sausage Bread has become one of my favorite things to do in the kitchen. There’s something really satisfying about taking simple ingredients—flour, yeast, cheese, meat—and turning them into something that makes people genuinely happy. Every time I pull it out of the oven, the smell alone is worth the effort.
I hope you’ll give this recipe a try. Don’t worry if your first attempt isn’t perfect—mine wasn’t either. Bread-baking is as much about learning as it is about the final product. Each time you make it, you’ll get a feel for the dough, understand your oven better, and develop your own little tweaks and preferences.
I’d love to hear how it turns out for you. If you make it, take a photo and let me know what you thought. And if you have a variation you love, I’m always excited to hear about it.
Happy baking!
Recipe Card
Name
Stuffed Cheesy Pepperoni and Sausage Bread
Ingredients
For the Dough:
* 3 cups all-purpose flour
* 1 packet (2¼ teaspoons) instant yeast
* 1 teaspoon salt
* 1 tablespoon sugar
* 1 tablespoon olive oil
* 1 cup warm water (around 110°F)
For the Filling:
* ½ pound Italian sausage (bulk or removed from casings)
* 1 cup pepperoni slices, roughly chopped
* 1½ cups shredded mozzarella cheese
* 4 ounces cream cheese, softened
* ¼ cup grated Parmesan cheese
* 1 teaspoon Italian seasoning
* ½ teaspoon garlic powder
* ¼ teaspoon red pepper flakes (optional)
* Salt and black pepper to taste
For Assembly and Baking:
* 1 egg, beaten (for egg wash)
*
Stuffed Cheesy Pepperoni and Sausage Bread
Ingredients
Method
- In a large bowl, combine flour, yeast, salt, and sugar. Whisk together, then add warm water and olive oil. Stir until a shaggy dough forms. Turn onto a floured surface and knead for 8 to 10 minutes until smooth and slightly elastic.
- Oil a bowl lightly, place dough inside, and turn to coat all sides. Cover with a damp kitchen towel and let rise in a warm spot for about 1 hour, or until doubled in size.
- While dough rises, brown the sausage in a large skillet over medium-high heat, breaking it into small pieces. Drain excess fat and cool slightly. In a bowl, combine cooled sausage, chopped pepperoni, mozzarella, cream cheese, Parmesan, Italian seasoning, garlic powder, red pepper flakes, salt, and pepper. Mix until evenly distributed.
- Punch down dough and turn onto a floured surface. Roll into a rectangle roughly 14 by 10 inches. Spread filling evenly over dough, leaving ½ inch around edges. Roll tightly from one long side like a cinnamon roll and pinch seam closed. Place seam-side down on a parchment-lined baking sheet, curving gently into a U-shape if desired.
- Cover loosely with plastic wrap and let rise for 45 minutes to 1 hour until puffy. Preheat oven to 375°F. Whisk together egg and water for egg wash, brush over top of dough, and sprinkle generously with extra mozzarella.
- Bake for 25 to 30 minutes until golden brown and cheese is melted and starting to brown. Internal temperature should reach about 190°F. If top browns too quickly, tent loosely with foil for the last 10 minutes.
- Cool on baking sheet for 5 minutes, then transfer to a cutting board. Wait another 5 minutes before slicing to allow cheese to set.